
Making Audio Drama: Getting Great Audio Recordings (No Matter Your Budget)
Night Shift: An Urban Fantasy Audio Drama is currently on episode 5 out of 16 episodes in our first season, with our 6th episode going out today. Our episodes are typically 35 to 45 minutes long and release every two weeks. Last week, we surpassed 5,000 downloads, with nearly 3,000 unique listeners. Is that good for a fledgling audio drama? Are we behind the curve, or ahead of it? Is there any way to know whether we’re doing the right thing apart from trying to make sense of the limited analytics on our host website?
When I started the Night Shift podcast back in December 2021, I had no clue what I was doing. I had the basis of a story, a few years making Youtube videos for editing experience, and a handful of audio dramas I’d enjoyed in the past to go off.
There’s plenty of data out there on how to make a podcast, what counts as successful, how to find advertisers, and how to market yourself, but if there’s anything I’ve learned very quickly, it’s that fiction podcasts aren’t just podcasts. Audio drama is a wholly different beast. Audio drama listener behavior is nothing like the patterns of data recorded for celebrity talk shows and investment advice podcasts, and it’s even less documented than everything else in an already under-analyzed medium.
Which is why I wanted to start this series about making an audio drama from scratch. It’s by no means a professional guide, more like a documentary of my experiences – as a mostly self-taught medium, I’m sure everyone has their own ideas and tricks. But if it can help someone who wants to start making a fiction podcast, or even someone who’s been at it for a while, it’s worth writing down. So here goes!
Like a lot of audio drama creators I see, I’m the writer, principal voice actor, audio editor, and marketer for my show. My story is pretty ambitious, and I decided to dive in and hire a full, fairly compensated voice cast for my first season (there are 39 of us), paid for out of pocket and by a handful of dedicated Patreon supporters leftover from my Youtube days.
I’m planning to cover a number of topics, from how to write your story and script, to how to cast, where to find audio production resources, and more, but I thought I’d start with the first hurdle to all podcast productions: how to get a good quality audio recording.
My own audio quality isn’t perfect by any means, especially because I have a lisp to contend with, but professional recording studio space just isn’t on the horizon for my expansive, yet still tiny, amateur production. Luckily, there are plenty of tricks and adjustments you can make whether you have a big budget or none at all.
Some of these explanations are lengthy, so here’s a rundown of what I’m writing about today:
Finding a decent space to record
Improving the sound quality in that space
The right microphone and equipment
Vocal warm-ups
Microphone positioning and avoiding plosives
Dealing with dry mouth
Room tone
Post-production and editing
The tips below can be employed for any budget (even No Budget, for the most part) and any kind of fiction podcast production, so if you’re trying to improve your audio, get stuck in and maybe you’ll be surprised how easy it actually is.
1 – Find the right space to record (and edit)
This is a broad one. If you’ve got the budget, you could blow it all on recording studio space. Searcing ‘recording studio in my area’ is bound to bring up something – there are 20 within a mile of my house, ranging from high-end professional studios to garage-to-rent setups. You could also splash out 3,000-10,000 on an acoustic booth for your house if you have the space for an ideal setup…but if you’re reading this, you’re probably not looking to splash out hundreds renting a space every time you need to record your script, or thousands on equipment.
Finding a good spot in your own home is all down to noise pollution and sound reflection.
Noise pollution might mean noisy neighbors, pets or family members running around, open windows, or the TV playing in another room, but it’s often also sound that goes under the radar when you’re not trying to record. Air conditioning, electronics, road noise. The biggest perpetrators of noise pollution in my house are the hot water tank which lets off a hum when the heating is on, and the washing machine, which vibrates the floor in a way my microphone notices way more than I do.
You can test noise pollution pretty easily, either by simply standing in each potential recording space in your house and listening, or by recording 30 seconds of silence in each room and comparing the outcomes to see which space is the quietest. Hiss, hum, and buzz are the three keywords I see thrown around a lot as the primary enemies of good audio.
Sound reflection is the way sound travels indirectly to your ears, bouncing off walls, and changing the overall sound (usually for the worse). The shape and dimensions of a room have a huge impact on sound reflection and will affect your recordings.
If you can find a smaller room or a closet, you’re already better positioned than recording in a large open room because you’ll get less echo. The best spaces avoid parallel walls for less reflections (the perfect cube room would be the worst possible recording space) and furniture and soft furnishings – things that interrupt the sound reflecting back – are great steps towards better audio.
Quiet spaces are good for editing your show too, so it’s worth finding a spot that works for you. Noise pollution can be a real bother when you’re trying to listen for whether or not there’s a single breath to silence in your audio. In general, the quieter and less reflective your space, the better it’s going to be to record and edit in.
However, you might also want to ask yourself whether the nature of your audio drama would benefit from recording in different spaces. If you’re planning on throwing yourself into sound design like I have, you probably want your audio to be as neutral as possible so you can build your scenes from the ground up. But if your show is simpler, if your main character records sitting at their kitchen table with all the ambiance that comes with that, you might actually want to sit at your kitchen table to get authentic room sounds. Don’t let proper recording space gatekeep you from getting into making audio drama. After all, you can always…
2. Improve your recording space
Once you’ve chosen your space, you can acoustically treat it with foam tiles if you want to further dampen sound reflection, but if you’re making a No Budget (or very low budget) production, you can also smother walls with blankets and floors with cushions to get a similar effect. In fact, my first recording space was a blanket fort in my bedroom, built out of my mattress and duvet. It was easily as effective as my horde of acoustic foam, just a lot of mess to tidy away every time.
When you face your microphone and speak, this is what your sound is doing:
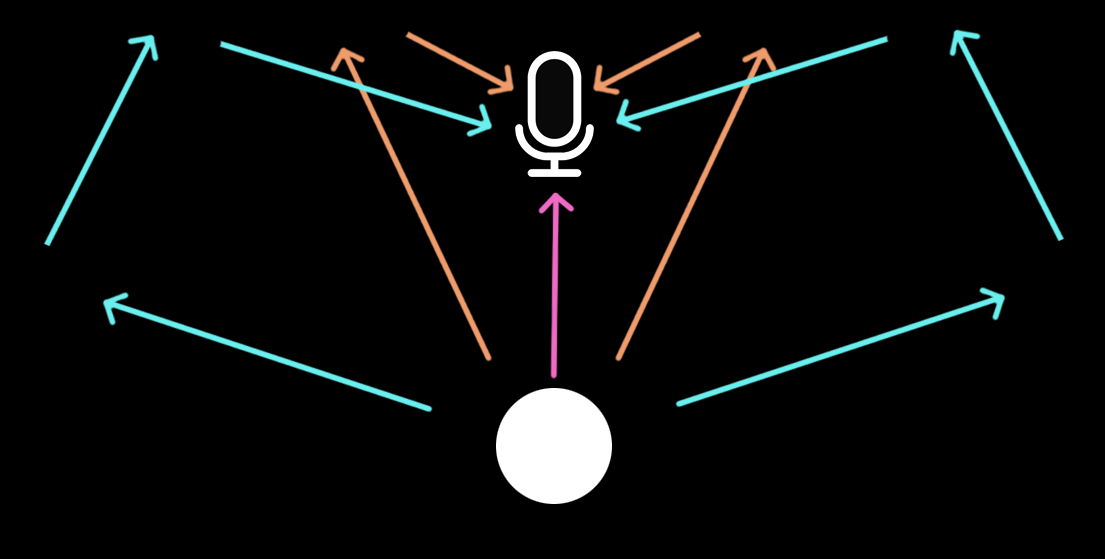
The idea of acoustically treating your space (which is the technical term, but I always call it sound dampening, or just making a room quieter) whether with foam tiles or blankets or anything else – is to reduce those reflections seen in the blue and orange lines.
The quickest way to get started is to cover the corners of your space. Ideally this includes the ceiling and floor corners of the whole room, not just where the walls meet, but you can probably get away with just the immediate space around where your microphone is going to be. Covering hard surfaces with soft things is another quick fix.
Carpet is great, rugs are still better than hard flooring, and closed curtains are better than just closed windows. After 7 years working as a video editor, I’m pretty used to the fact creative people often end up working in the dark.
Turn off your phone, or at least put it in airplane mode. Data is constantly transmitted to and from devices these days and you’re better off not risking getting that annoying high-pitched squeal or repetitive beeps in the background of your recordings.
If you’re looking for more professional acoustic treatments, starting with classic wedge foam tiles is a low-cost starting point. They usually come in packs of 8 up to packs of 100, and can be nailed or glued to the wall, or stuck up with command strips if you’re in a rental. They’re super light.
For something higher budget, you can find acoustic panels that cover whole walls, many of which are architecturally beautiful – I’d love to be able to afford to treat my office in some of those beautiful fiberglass panels. There’s also plenty of mid-range choices, pop up acoustic tents, mobile foam walls and so on. I use 20 acoustic tiles in optimum spots around my understairs cupboard, and a foam desktop screen that sits behind my mic. Don’t stress over exactly which brand or shape to buy too much, they’re all pretty much the same thing.
Foam will reduce high frequencies in your sound. To reduce low frequencies, the kind that make your audio sound ‘muddy’ and diluted, you’re going to want to look up bass traps. They’re more highly engineered than foam tiles. But as I said, blankets and cushions will do the trick if you’re getting started – there’s plenty to blow the budget on when producing audio drama, so don’t prioritize professional equipment!
3. Choosing a microphone and other equipment you’re going to want
If there’s anything you’re going to invest in, it’s probably going to be a microphone. They start really cheap, and they go up in price exponentially. It’s hard to know what’s worth it and what isn’t, and everyone who likes audio has a different opinion – this one is mine.
First let’s talk about the different microphone types:
Phone or Built-in Computer Microphones – this one is self-explanatory, and easily the most accessible. Most cell phones come with a voice memo app, and you can usually record straight onto a laptop in one way or another. You can improve phone recording quality relatively cheaply with a plug-in lavalier microphone that clips onto your shirt, but unless your audio drama is fully recorded on a phone as its gimmick (there’s nothing wrong with this if it is! I made a fairly successful and very succinct 10-episode found footage horror video series almost solely on various cellphones and it worked out very well) you’re probably going to want something more.
Headsets – Night Shift did an open casting call with no restrictions on equipment or experience, and had more than 2500 auditions. I noticed that a lot of the auditions came from Twitch streamers, and a lot of them were recorded with gaming headsets. I don’t know much about these, but the sound wasn’t always the best. The nature of my show means a fair few ‘phone calls’ make it into the story, and headsets were fine for roles like that. There’s probably some great high-end gaming headsets out there with good quality sound, but if you’re picking a microphone for making an audio drama rather than streaming, your money is probably better spent elsewhere.
USB – This is my microphone of choice. Simple to use, relatively low cost, and there are some very decent ones out there. They usually plug and play straight into your computer. They record digital sound, so there’s an element of compression, but you can get great sound this way. However, there’s a whole lot of choice out there and it’s hard to know what you’re going to like, especially as sound also depends on your voice as well as the microphone.
XLR – XLR microphones are considered the best. Some argue they’re entirely comparable to USB mics and that there is no point in upgrading. The difference is that XLR microphones record in analog, rather than digital, and you have much greater control over the sound output. But they tend to cost more, and they also require extra equipment and more technical knowledge to operate.
Myself and a handful of the other principal actors in Night Shift record on a Rode NT-USB microphone. Rode is my go-to brand, but I don’t have a particularly strong justification as to why – when I was interning as a camera operator, the cinematographer I was following around preferred Rode for technical reasons and I’m not a technical person, so I’ve always taken his word for it that they’re good quality. I used to shoot all video with a Rode Video Mic Pro, and between the two mics, I’ve never had a problem with them.
It’s easy to use, plugs into any Windows or Apple computer with no need to fiddle around with drivers and was only around £100/$120. I’ve had it for four years and have no complaints.
You can spend less on a USB microphone, or way more. The easiest way to choose one is probably to find a handful in your budget, go to Youtube and plug the name of the microphone and ‘sound test’ into the search bar. Listen to the various sound qualities and pick one that you like the sound of.
If you do want an XLR, spend some time reading and watching tutorials on how to operate the XLR audio interface you’ll also need to buy to work it. Greater control over sound also means greater opportunity to get it wrong. You’ll also need an XLR cable, which can hike the price right up, and I’ve read that a good XLR cable is even more important than a good XLR microphone.
This might sound overwhelming, but there’s good news! There is other equipment you can pair with any microphone to improve your sound, all of which can be bought pretty cheaply.
Boom arms raise your microphone off the desk if you’re recording at one, which most of us probably are. You might ask, why does it matter if my mics on my desk or off it? The first thing boom arms do is improve your mic positioning, which optimizes the sound you can get quickly. They also save your posture from the terrible desk hunch, allowing you to breathe better, which is vital for good voice recordings.
You can get these at all price ranges, but the weight of your microphone affects what kind of boom arm you’re going to need – heavier microphones like the Blue Yeti USB probably require a sturdier boom if you want the boom to last. Make sure the screw fitting on your boom is the same size as your microphone, or otherwise look for a size adapter. These are pretty cheap and easy to find on Amazon. I use – no surprises here – a Rode PSA-1 boom arm. If you’re recording standing up, you might want to replace your boom arm with an upright microphone stand for the same effect.
Mine came with a shock mount, but you might have to find one separately. The shock mount prevents low-level audio disruptions caused by vibrations - including ones from your microphone - whilst recording and limits the microphone from knocking on anything, including on the boom arm. They mount onto the boom and the microphone attaches to them.
The last super useful low-budget equipment you’re going to want to add is a pop shield (also called a pop filter, pop screen) which is a flimsy looking fabric screen that sits between the microphone and your mouth. It helps stop plosives and popping sounds which your mouth makes naturally as you speak but are horrible to listen back to. Usually they fix onto the boom arm too, the final piece in your audio recording megazord.
4. Vocal Warm-Ups
If you work out, you’ll know that not warming up your body before intensive exercise can lead to physical injuries. Warm-ups also improve your performance when exercising your muscles, and it’s no different when exercising your voice. Not warming up before voice acting is going to cause a strain or a sore throat, and your words will not be as clear. Warming up improves diction, enunciation, and vocal range, and best of all, they’re free.
There are dozens of great warm-ups to follow on Youtube, from people more knowledgable than me, and if you’d rather just do your own, Masterclass has a great list of what kinds of warm-ups you can do.
To protect your vocal cords from damage, you’re also going to want to warm down after a long recording session.
5. Microphone Positioning and Avoiding Breaths and Plosives
Plosives are letters that produce the most air pressure when you speak. These sounds are typically t, k, and p or d, g, and b. You might find when you listen back to your recording that words that rely heavily on these letters ‘explode’ or get significantly louder when you say them. They might cause peaks in your audio that are painful to listen to and often extremely off-putting.
I’ve already covered pop shields for your microphone as a key way to reduce plosives, but microphone positioning is also key. To make sure you’re sitting the right distance from your mic for talking, put your thumb to your lips and stretch out your pinky finger. Touch it to the microphone: that’s the ideal distance (but if you’re going to yell for a scene, you probably want to move back!)
Now, turn so the microphone is positioned at the corner of your mouth, slightly above it. This non-direct angle means the air pressure from plosives is not expelled directly into the microphone and should reduce them significantly, if not entirely. This will also stop the microphone from catching breaths as loudly.
Some breaths feel natural to listen to, but others can be really disruptive during an audio drama performance, so practice taking them between dialogue sentences, in spaces you can easily remove in editing.
Make sure you’re positioning yourself well too. Don’t slouch, don’t wear anything that restricts your breathing, and relax. Your lungs need space to breathe deeply to give your best performance.
6. Dealing with Dry Mouth
You’ve got your equipment, you’ve set up your recording space, and you’ve warmed up every muscle in your body just in case, but none of these things are going to help if your words aren’t coming out right. I’m not sure if Dry Mouth is the technical word for this – in my house (where I live with two of my other VAs) we call this gunky mouth, thick mouth, or Tom Holland syndrome because it feels like there’s a frog in your mouth. It’s that feeling when your words are sticking to your lips. I have a speech impediment which makes voice acting an ambitious choice for me as it is, but the least I can do is give my recordings a fighting chance by avoiding the sticky feeling where I can.
Here’s my best collected tips for this disasterous recording condition, with heaps of non-technical language:
Brush your teeth – in fact, floss and swill mouth wash too. One of the primary causes of gritty or gunky voice recordings is debris in your mouth. It might not feel like anything, but if you’ve got crumbs swilling about in there, they’re going to affect the sound as you speak.
Hydrate – this is vital to keep you from drying out and to avoid hurting your vocal cords. I always keep a big glass of water on my studio desk. Avoid carbonated drinks and sugary drinks like the plague, they’ll make you stickier.
Chew green apples – without the skin preferably, because that’ll become mouth debris. Slices of apple encourage saliva production like no one’s business, which is the number one cure for the mouth gunk.
Mouth Stretches – this is likely part of your vocal warm-ups, but if you’re feeling that nasty dry mouth feeling, stop your recording and stretch your mouth again. The dumber the faces, the more effective, trust me.
7. Recording Room Tone
There’s no two ways about it, when you’re editing your audio drama, you’re going to be chopping up bits of audio, whether you’re taking out breaths, adding pauses to make it sound natural, or pairing it with someone else’s dialogue. Especially if you’re remote recording like we are at Night Shift, you’re going to find different microphones and recording environments don’t always match.
The easiest way to deal with this, at least in my experience, is to record room tone. That means recording a minute or so of silence in your recording space so you’ve got a track consisting of just whatever background noise hasn’t been eliminated. You can run this track under all the dialogue in your audio drama, and it’ll help level out discrepancies in different recordings or moments where you have to silence a sound you don’t like. If you are remote recording, ask your other cast members for this too.
8. Post-Production Improvements
Recording good quality audio from the get-go is always going to be better than trying to ‘fix it in post’ with editing hacks, but they can still do wonders for your sound quality. There’s more to this than I can fit in your post, but a decent EQ filter or Limiter can change the sound a lot. If you have really bad hiss or hum, you can try noise or hum removal or compression, but this will reduce the overall quality of your audio, so use compression in moderation.
Great audio also comes down to great sound design and mixing – any quality track can be transformed into an incredible scene with the right ambience, background music, foley sound effects and pacing. There’s plenty to be said on this, probably in another post, but Youtube is a great place to start if you’re looking for a quick tutorial for your editing software.
So there we have it – 8 easy, free or low-budget tips to improve your audio recording quality quickly and without much effort. As I said before, I’m no expert. I’m learning as I go and sharing the tips I’m picking up via trial, error, and a lot of research, but I felt there was a huge lack of resources for producing audio drama when I got started. If this blog series can help anyone else produce their dream show, then it’s well worth the time to write it.
If you like urban fantasy, cool scientific progress, mysteries, mild horror, LGBTQ+ stories, found family stories, and stories of overcoming hardships and being different, be sure to check out Night Shift: An Urban Fantasy Audio Drama on Apple Podcasts, Spotify, (or listen on this website!)
Night Shift is set in a world filled with powers both natural and artificial. It follows the story of Sebastian Fen, a troubled young man in Echor City, USA, who sets about unraveling local conspiracies surrounding the city and its formidable bioengineering super-corporation, Augur, and soon finds himself dangerously entangled deep in the very secrets and mysteries he’s trying to uncover.
Let us know what you think, and if you enjoy the show, or you’ve enjoyed this blog post you can drop me a coffee on Ko-Fi!
Julian Maclurg
@gunpowderstars